
Embarking on a journey of DIY flooring ideas opens up a world of creativity and personalization for your home. As more homeowners opt for hands-on projects, the allure of transforming spaces with unique flooring solutions has never been more appealing.
From cost savings to enhanced property value, embracing DIY flooring not only allows you to showcase your personal style but also presents an eco-friendly approach with innovative materials. Whether you’re a seasoned DIYer or just starting out, this guide will inspire you to roll up your sleeves and breathe new life into your floors.
Exploring the Benefits of DIY Flooring Choices

Choosing DIY flooring options over professional installation can open a world of benefits that not only enhance your living space but also enrich your overall experience as a homeowner. The allure of DIY projects lies in their potential for both creativity and savings, making them an attractive option for many. As you delve into the world of DIY flooring, you’ll discover how these choices can transform your home while keeping your budget intact.One of the most compelling advantages of opting for DIY flooring is the significant cost savings it can offer.
Professional installation often includes hefty labor charges, which can add up quickly. By taking on the task yourself, you can minimize expenses and allocate your budget towards higher-quality materials or additional home improvements. Furthermore, DIY flooring projects allow for flexibility in your timeline, enabling you to complete the work at your own pace without the pressure of hiring contractors.
Personalized Touch and Enhanced Creativity
Embarking on a DIY flooring project enables homeowners to infuse their unique style into their spaces. This personal touch not only elevates the aesthetics of a room but also creates a sense of ownership and pride in your home. Different flooring materials, patterns, and colors can be explored to align with individual tastes and existing decor. The creative aspect of DIY flooring can be embraced through various methods and materials.
Here are some popular examples that highlight this opportunity for personalization:
- Vinyl Plank Flooring: Available in a variety of designs, including wood and stone looks, vinyl plank flooring is both affordable and easy to install, offering a chance to express your style effortlessly.
- Laminate Flooring: With numerous finishes and patterns, laminate allows you to mimic the look of natural wood without the hefty price tag, making it a smart choice for creativity on a budget.
- Painted Concrete: A unique way to personalize an otherwise plain concrete floor; using stencils or freehand designs, you can transform your concrete into a piece of art.
Through these options, homeowners can experiment with their craft, creating spaces that truly reflect their personality and preferences. This sense of creativity can be incredibly fulfilling, further adding to the appeal of DIY flooring.
Increased Property Value
Well-executed DIY flooring projects can significantly contribute to the overall value of your property. When done correctly, new flooring can enhance the aesthetic appeal of a home, making it more attractive to potential buyers. According to the National Association of Realtors, quality flooring upgrades can yield a return on investment that ranges from 70% to 80%. Crucially, the key to increasing property value lies in the quality of the materials and the craftsmanship of the installation.
Here are a few factors that can lead to higher property valuation through DIY flooring:
- Durability: Choosing high-quality materials ensures that flooring withstands wear and tear, appealing to buyers looking for longevity.
- Trend Appropriateness: Staying current with flooring trends can resonate well with prospective buyers, as modern aesthetics are often more desirable.
- Overall Cohesion: A well-executed DIY flooring project that matches the existing design elements can create a cohesive look throughout the home, enhancing its appeal.
By investing time and effort into DIY flooring, homeowners not only improve their living environment but also position themselves to reap financial rewards when it comes time to sell.
“Investing in quality DIY flooring is an investment in your home’s future value.”
Innovative Materials for DIY Flooring Projects
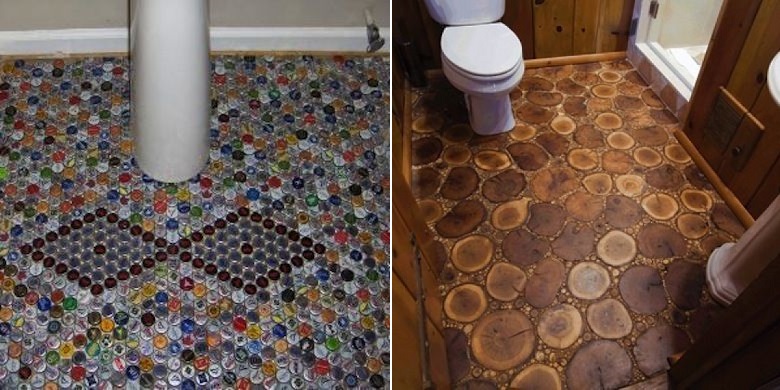
Exploring unconventional materials for DIY flooring can completely transform your space and contribute positively to the environment. From repurposed wood to cork, these innovative choices combine functionality with sustainability, making them ideal for creative and eco-conscious homeowners. Here, we will delve into a few unique materials that are gaining popularity in the DIY flooring scene.
Unconventional Flooring Materials
Using innovative materials in DIY flooring projects not only enhances the aesthetic appeal of your home but also promotes sustainability. Here are a few unconventional materials and their benefits:
- Repurposed Wood: Salvaged wood from old barns or pallets can create rustic and charming flooring. This material is not only aesthetically pleasing but also reduces waste by giving new life to discarded wood.
- Vinyl: This versatile material comes in a myriad of designs, mimicking natural wood or stone. It’s cost-effective, easy to install, and resistant to water, making it ideal for various spaces.
- Cork: Harvested from the bark of cork oak trees, cork flooring is eco-friendly, providing excellent insulation and soundproofing. It’s also soft underfoot, making it comfortable for prolonged standing.
The sustainability benefits of these materials significantly contribute to eco-friendly living. For instance, repurposed wood helps decrease the demand for new lumber, while cork is a renewable resource that protects the environment by preserving the cork oak forests.
Pros and Cons of DIY Flooring Materials
Understanding the advantages and disadvantages of different flooring materials can help in making informed decisions for your DIY projects. Below is a comparison table showcasing some popular DIY flooring materials:
| Material | Pros | Cons |
|---|---|---|
| Repurposed Wood |
|
|
| Vinyl |
|
|
| Cork |
|
|
Choosing the right flooring material can significantly impact both the aesthetic and environmental footprint of your home.
Step-by-Step Guide to Installing Your Own Flooring
Installing your own flooring can be a rewarding and cost-effective way to enhance the aesthetics of your home. Whether you’re considering laminate, tile, or hardwood, understanding the process can save you time and money while allowing you to express your personal style. This guide will provide a detailed overview of the steps involved in each flooring type, along with the necessary tools and materials.
Essential Tools and Materials for Flooring Installation
Before diving into the installation process, it’s crucial to gather the right tools and materials. Having everything on hand will streamline your project and help avoid unnecessary delays. Here’s a list of essential items you’ll need:
- Measuring tape: For accurate measurements.
- Utility knife: For cutting materials like laminate and underlayment.
- Mallet: To gently tap planks into place without damaging them.
- Square: To ensure your cuts and installations are straight and true.
- Level: To confirm that your flooring is even.
- Flooring adhesive: Required for tile and some hardwood installations.
- Underlayment: Provides cushioning and soundproofing, especially for laminate and hardwood.
- Grout (for tile): Fills in spaces between tiles for a finished look.
Step-by-Step Guide to Installing Laminate Flooring
Laminate flooring is popular due to its durability and ease of installation. Follow these steps to install laminate flooring effectively:
- Prepare the subfloor by cleaning and leveling it. Ensure it’s dry and free from debris.
- Acclimate the laminate planks in the room for 48 hours to adjust to the temperature and humidity.
- Lay down the underlayment, ensuring it’s seamless and covers the entire area.
- Begin installing the laminate planks from one corner of the room, clicking them together according to the manufacturer’s instructions.
- Use spacers to maintain a gap around the perimeter of the room for expansion.
- Continue laying planks row by row, cutting the final piece to fit as necessary.
- Remove spacers, and install baseboards or moldings to finish the look.
Step-by-Step Guide to Installing Tile Flooring
Tile flooring offers versatility and a unique aesthetic. Here’s how to install it:
- Prepare the subfloor by ensuring it is clean, dry, and level. Any imperfections here will affect the tile installation.
- Plan the layout by dry-laying tiles in the center of the room, marking reference lines for alignment.
- Apply thin-set mortar using a trowel, covering an area manageable for your tile size.
- Start placing tiles from the center outwards, pressing them firmly into the mortar.
- Use tile spacers to maintain even gaps for grout lines.
- Allow the mortar to set according to the manufacturer’s guidelines, usually 24 hours.
- After the mortar has set, remove the spacers and apply grout between the tiles.
- Clean excess grout with a damp sponge and allow it to cure for the specified time.
Step-by-Step Guide to Installing Hardwood Flooring
Hardwood flooring adds warmth and elegance to any space. Here’s a step-by-step guide for installation:
- Ensure your subfloor is clean, dry, and level, as hardwood requires a solid base.
- Acclimate the hardwood planks by letting them sit in the installation space for at least 72 hours.
- Decide on the direction of the planks, typically running parallel to the longest wall.
- Install a vapor barrier if necessary, particularly in moisture-prone areas.
- Start laying the first row, ensuring the tongue side is facing the wall. Use spacers for expansion gaps.
- Continue installing rows, staggering the joints for a more natural look.
- Secure the planks either by nailing, stapling, or using adhesive, depending on the type of hardwood.
- Finish by installing baseboards, ensuring everything looks polished and complete.
“A well-installed floor can transform a space, adding value and style to your home.”
Creative Design Ideas for DIY Flooring
Exploring creative design ideas for DIY flooring can transform any space, reflecting your unique personality while enhancing the aesthetic appeal. With a myriad of options available, from patterns to colors and finishes, you have the power to elevate your home’s atmosphere significantly.When it comes to DIY flooring, the choice of design greatly influences the overall vibe of a room. Whether you prefer a modern, minimalist look or a more intricate, vintage feel, incorporating personal style into your flooring can create a cohesive design throughout your space.
Understanding how colors and textures interact can help you achieve a balanced and inviting environment.
Unique Patterns and Textures
Utilizing various patterns and textures can add depth and interest to your flooring. Below are some compelling design concepts to consider:
- Herringbone Pattern: This classic design adds a sophisticated touch to any room. Using laminate or hardwood, you can create a stunning visual effect that draws the eye.
- Geometric Shapes: Incorporating geometric patterns with tiles or painted floors can add a contemporary flair, making any space feel trendy and dynamic.
- Stenciled Designs: Using stencils to personalize your flooring can be both fun and artistic. This technique works well on wood or concrete surfaces and allows for endless creativity.
- Layered Textures: Combining different flooring materials, such as area rugs over hardwood, can provide warmth and a touch of luxury to your living areas.
Color Schemes and Finishes
The right color scheme and finish can dramatically alter the perception of space. Here are some color and finish ideas that can enhance your DIY flooring:
- Bold Colors: Opting for vibrant shades, such as deep blues or rich greens, can make a statement. These colors work best in open spaces that need a focal point.
- Neutral Tones: Soft greys, beige, or whites create a timeless look that pairs well with any decor style, providing a clean backdrop for your furniture and accessories.
- Textured Finishes: Consider matte or satin finishes for wood floors that can add a rustic charm while remaining easy to maintain.
- Glossy Finishes: High-gloss finishes can enhance the brightness of a room, making spaces feel more expansive and lively.
Incorporating Personal Style
Incorporating your personal style into flooring choices is essential for creating a home that feels uniquely yours. It’s important to consider how each element complements your existing decor. Here are some tips to infuse your style into DIY flooring:
- Choose a Theme: Whether it’s coastal, industrial, or traditional, having a clear theme can guide your flooring decisions.
- Mix and Match: Combining different styles, such as rustic wood with modern tiles, can create an eclectic yet harmonious look.
- Focus on Functionality: Select flooring that suits your lifestyle, such as durable materials for high-traffic areas or softer options for cozy spaces.
- Accessorize Wisely: Use area rugs, furniture, and art to enhance the flooring’s impact and tie the room together.
Visual Inspiration and Examples
Imagining the possibilities for your DIY flooring can be greatly aided by visual examples. For instance, a living room with a herringbone wood floor topped with a plush area rug creates a warm and inviting atmosphere. Another option is a minimalist kitchen featuring large-format tiles in a soft gray, paired with white cabinets, which evokes a sleek and modern feel.
Consider a hallway with bold, geometric patterned tiles that lead guests through the home, providing an exciting visual journey. Each of these examples showcases how different designs, colors, and finishes can elevate a space and reflect personal style, demonstrating the endless possibilities of DIY flooring.
Troubleshooting Common DIY Flooring Issues
When taking on a DIY flooring project, it’s not uncommon to face some challenges along the way. Whether you’re a seasoned DIYer or just starting out, understanding the common issues that may arise can save you time and frustration. This segment delves into those frequent problems and offers practical solutions to ensure your flooring installation turns out both beautiful and durable.
Common Problems with Flooring Installations
Various issues may arise during a DIY flooring project. Recognizing these problems early can help in addressing them promptly. Here are some of the most frequent issues:
- Uneven Surfaces: Uneven surfaces can lead to improper installation and visible gaps between planks or tiles.
- Gaps Between Planks: Gaps can occur due to fluctuating humidity levels or improper installation techniques.
- Peaking: This refers to flooring buckling, typically caused by restricted expansion space.
- Scratches and Dents: Surface damage can be a concern, especially with softer flooring materials.
- Adhesive Problems: Improper application can lead to flooring that shifts or separates.
Solutions for Flooring Issues
Addressing these common issues is essential for achieving a professional finish. Here are some effective solutions and tips:
1. For Uneven Surfaces
Use a self-leveling compound before installation to create a smooth base.
Regularly check the subfloor during installation for any dips or rises that need attention.
2. To Fix Gaps Between Planks
Ensure proper acclimation of the flooring material before installation. This allows the material to adjust to the room’s humidity. Use a filler product specifically designed for flooring gaps if gaps have already formed.
3. Preventing Peaking
Leave adequate expansion gaps around the perimeter of the flooring. The general rule is a gap of at least 1/4 inch. Avoid using too much adhesive, as this can restrict movement and lead to buckling.
4. Addressing Scratches and Dents
Invest in protective furniture pads to minimize scratches.
For minor dents, a steam method can help lift the dent by applying moisture and heat.
5. Resolving Adhesive Problems
Follow the manufacturer’s guidelines for adhesive application, ensuring even coverage.
When using peel-and-stick options, ensure the surface is clean and dry before application.
Inspection Checklist for Quality Flooring
To maintain optimal flooring quality, conducting thorough inspections during and after installation is crucial. This checklist will help you ensure everything meets professional standards:
- Subfloor Check: Inspect for moisture, damage, and levelness before starting.
- Flooring Acclimation: Confirm that the flooring material has acclimated to the room’s temperature and humidity.
- Alignment: Ensure planks or tiles are aligned properly, maintaining a straight line throughout.
- Expansion Gap: Verify the presence of proper expansion gaps around walls and fixed objects.
- Surface Finish: Check for uniformity in finish and absence of scratches or blemishes post-installation.
Budgeting for Your DIY Flooring Adventure
Creating a realistic budget for your DIY flooring project is crucial to ensure that you don’t overspend or compromise on quality. A well-planned budget helps you allocate your resources efficiently, making the entire experience smoother and more enjoyable. By understanding the costs associated with materials, tools, and potential additional expenses, you can make informed decisions that fit your financial situation.When embarking on a DIY flooring project, it’s essential to account for all expenses involved, from the initial purchase of materials to the tools required for installation.
It’s equally important to explore strategies that allow you to save money without compromising quality. Crafting a comprehensive budget will help you navigate through various flooring options while maintaining cost-effectiveness.
Material and Tool Cost Breakdown
A clear breakdown of potential expenses is vital for effective budgeting. Here’s a detailed look at some common flooring types and their associated costs:
| Flooring Type | Material Cost (per sq. ft.) | Tool Cost (initial investment) | Installation Cost (if applicable) |
|---|---|---|---|
| Laminate | $1.50 – $4.00 | $50 – $150 | $2.00 – $5.00 |
| Vinyl Plank | $2.00 – $5.00 | $50 – $100 | $1.50 – $4.00 |
| Hardwood | $3.00 – $12.00 | $100 – $200 | $3.00 – $8.00 |
| Tile | $1.00 – $15.00 | $70 – $150 | $5.00 – $10.00 |
This table provides a snapshot of what to expect for your flooring project. Costs can vary widely depending on quality, brand, and location, hence, it’s wise to shop around and compare prices.
Strategies for Saving Money
Implementing specific strategies can help you save money throughout your flooring project. Here are some effective methods:
1. Shop Sales and Clearance
Always be on the lookout for sales at local home improvement stores or online retailers. Clearance items can offer significant savings.
2. Purchase in Bulk
If you’re planning a large project, buying materials in bulk can often reduce the overall cost per unit.
3. Rent Tools Instead of Buying
For tools that you’ll only use once or twice, consider renting instead of purchasing. This can drastically reduce your initial investment.
4. DIY Installation
Taking on the installation yourself can save the cost of hiring professionals. There are plenty of resources online that can guide you through the process.
5. Choose Cost-Effective Materials
Opt for flooring materials that provide a good balance of quality and cost. For instance, vinyl plank flooring can offer a stylish look without breaking the bank.
“Smart budgeting is the backbone of any successful DIY flooring project.”
By combining these strategies with a well-structured budget, you can embark on your flooring adventure without financial stress. Keep your goals in mind, remain flexible, and adapt your budget as necessary to ensure your project remains both affordable and satisfying.
Closing Summary
In conclusion, DIY flooring ideas offer a fantastic opportunity to enhance your home’s aesthetic while saving on costs and adding value. With the right materials, design concepts, and a little elbow grease, you can achieve stunning results that reflect your personal taste and creativity.
FAQ
What tools do I need for DIY flooring?
Essential tools include a utility knife, measuring tape, level, saw, and a flooring roller for proper installation.
How long does it take to install DIY flooring?
The time varies based on the type of flooring and the size of the area, but most projects can be completed in a weekend.
Can I install flooring over existing floors?
Yes, many types of flooring can be installed over existing floors, but ensure the surface is clean, level, and in good condition.
What is the most affordable DIY flooring option?
Vinyl plank flooring is often the most budget-friendly option, offering durability and a variety of styles.
How do I maintain my DIY flooring?
Regular cleaning, avoiding excess water, and using appropriate cleaners will help maintain the quality and appearance of your flooring.